wordpress:wordpressで固定ページのコメント欄を削除

WordPressで固定ページに表示されるコメント欄を表示しないようにカスタマイズします。
お問い合わせのページを作ったら、二重にフォームが表示されたので固定ページからはコメント欄を削除しました。
Wordpressの固定ページテンプレートのpage.phpでコメント欄が表示する箇所をコメントアウトすれば、コメント欄は表示しなくなります。

■ 固定ページテンプレート(page.php)
「<?php comments_template( ”, true ); ?>」書いている箇所をコメントアウトします。
また、サイドバーが表示されていなかったので「<?php get_footer(); ?>」の上に
「<?php get_sidebar(); ?>」を追加しました。

<?php get_header(); ?>

        <div id="primary">
            <div id="content" role="main">

                <?php while ( have_posts() ) : the_post(); ?>

                    <?php get_template_part( 'content', 'page' ); ?>

                    // 下記をコメントアウト
                    <?php //comments_template( '', true ); ?>

                <?php endwhile; // end of the loop. ?>

            </div><!-- #content -->
        </div><!-- #primary -->
// 下記を追加し、サイドバーを表示
<?php get_sidebar(); ?>
<?php get_footer(); ?>

FCKeditor:FCKeditorでサーバーブラウザーボタンを無効にする

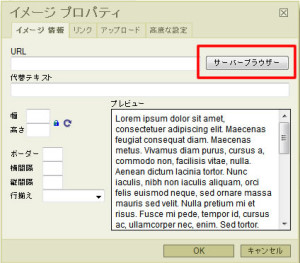
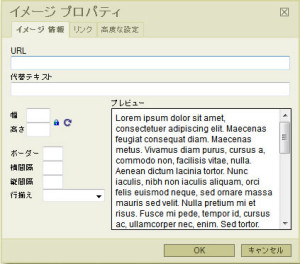
FCKeditorの「イメージ挿入/編集」でサーバーブラウザーボタンを表示しない方法を記載します。
FCKeditorの設定ファイルで「fckconfig.js」というjsファイルがあるので、サーバーブラウザーボタンの設定値を変更し、サーバーブラウザーボタンを無効にします。

■ サーバーブラウザーボタンが有効になっている場合
名称未設定-2

■ サーバーブラウザーボタンが無効になっている場合
名称未設定-4

■ FCKeditorの設定
FCKeditorを置いているフォルダの直下にfckconfig.jsがあります。
下記の設定で「true」の値を「false」に変更します。
fckconfig.jsを変更後、サーバーブラウザーボタン確認すると表示されていないことが確認できます。

FCKConfig.LinkBrowser = false ;
FCKConfig.ImageBrowser = false ;
FCKConfig.FlashBrowser = false ;
FCKConfig.LinkUpload = false ;
FCKConfig.ImageUpload = false ;
FCKConfig.FlashUpload = false ;

wordpress:wordpressの投稿記事内でjavascriptを使用する

投稿記事内で直接javascriptを記述し動作させようとしたが、投稿記事内ではscriptが機能しないらしいです。
なので今回は投稿記事内でjavascriptを動作させるために「inline-javascript」というプラグインを導入した際の方法をメモ。
「inline-javascript」インストールしてプラグインを「有効化」します。

■ 使用方法

[inline](使用するjavascriptを記述)[/inline]

[inline][/inline]で囲むだけで、正常に動作しました。

■ 使用例

[inline]
<script type="text/javascript">
    alert('wordpressの投稿記事内でjavascriptを使用');
</script>
[/inline]

※しかし、「inline-javascript」を有効にした際にサイト全体の表示(改行)などが崩れてしまった為、「Custom CSS and JS」をインストールして使用しています。

「Custom CSS and JS」の導入方法・使い方については「coliss」さんの、
WordPressの記事ごとに個別のCSS, JavaScriptを追加できるプラグイン -Custom CSS and JS
を参考にさせていただきました。

jQuery:jQueryを使用して<div>要素の表示・非表示

jQueryを使用して<div>要素をクリックした場合、別の<div>要素の表示・非表示を行いました。
また、jQueryを使用せずにjavascriptでも行った場合の方法を記載します。
jQuery日本語リファレンスを参考にしました。

■ jQueryメモ

toggle()

各要素のうち、表示状態にあるものを非表示にし、非表示状態にあるものは表示状態にします。

■ 使用例(jQuery)

[javascript]

<script type="text/javascript" src="http://ajax.googleapis.com/ajax/libs/jquery/1.7.2/jquery.min.js"></script>
<script type="text/javascript">
$(function(){
    // 「id="jQueryBox"」を非表示
    $("#jQueryBox").css("display", "none");

    // 「id="jQueryPush"」がクリックされた場合
    $("#jQueryPush").click(function(){
        // 「id="jQueryBox"」の表示、非表示を切り替える
        $("#jQueryBox").toggle();
    });
});
</script>

[HTML]

<div id="jQueryPush">クリック(jQuery)</div>
<div id="jQueryBox">
    <p>jQueryを使用し表示・非表示</p>
</div>

■ サンプル(jQuery)

【ここをクリック(jQuery)】

jQueryを使用し表示・非表示

■ 使用例(javascript)

[javascript]

<script type="text/javascript">
window.onload = function(){
    Box = document.getElementById("javascriptBox");        // 「id="javascriptBox"」をBox変数に格納
    Push = document.getElementById("javascriptPush");    // 「id="javascriptPush"」をPush変数に格納
    Box.style.display = 'none'; // Box変数のstyleを「display: none;」にする

    // Push変数がクリックされた場合
    Push.onclick = function(){
        // 「id="javascriptBox"」が「display: block;」の場合、クリックすると「display: none;」にする。
        // また「id="javascriptBox"」が「display: none;」の場合、クリックすると「display: block;」にする。
        Box.style.display = Box.style.display == 'block' ? 'none' : 'block';
    }
}
</script>

[HTML]

<div id="javascriptPush" onclick="return false;">クリック(javascript)</div>
<div id="javascriptBox">
    <p>javascriptで表示・非表示</p>
</div>

■ サンプル(javascript)

【ここをクリック(javascript)】

javascriptで表示・非表示

wordpress:wordpressにSNSボタン設置方法

このサイト(raining)にSNSボタンを設置した際の方法を記載します。
今回はTwitter、facebook、google+、はてなブックマーク、mixiのSNSボタンを設置しました。
それぞれの設置方法をメモしておきます。
wordpressで直接ファイルにコードを埋め込む方法で設定しました。
ファイルは/wp-content/themes/使用テンプレート/content-single.phpの<?php the_content(); ?>の下に下記の方法でコードを埋め込んでます。

■ wordpress テンプレートタグ

<?php the_permalink(); ?>

現在の投稿のパーマリンクURIを取得し表示する

<?php the_title(); ?>

現在の投稿のタイトルを取得し表示する
※上記は今回利用したwordpressのテンプレートタグを記載しています。他にも色々なテンプレートタグがあります。

■ SNSボタン設置方法


Twitterのツイートボタン

Twitterのツイートボタンを作成するページでURLなどの情報を入力し、コードを取得する。
https://twitter.com/about/resources/buttons
コード取得後、data-urlを「 data-url=”<?php the_permalink(); ?>”」と書き換える。
数字をツイートボタンの上に表示する場合は「 data-count=”vertical”」を追加する。

<a href="https://twitter.com/share" class="twitter-share-button" data-url="<?php the_permalink(); ?>" data-lang="ja" data-count="vertical">ツイート</a>
<script>!function(d,s,id){var js,fjs=d.getElementsByTagName(s)[0];if(!d.getElementById(id)){js=d.createElement(s);js.id=id;js.src="//platform.twitter.com/widgets.js";fjs.parentNode.insertBefore(js,fjs);}}(document,"script","twitter-wjs");</script>

facebookのいいねボタン

Facebook Like ButtonページでURLなどの情報を入力しコードを取得する。
http://developers.facebook.com/docs/reference/plugins/like/
今回はHTML5でコードを取得。
コード取得後、data-hrefを「 data-href=”<?php the_permalink(); ?>”」と書き換える。
画像の表示などがうまくいかない場合は、metaタグでOGP(Open Graph Protocol)を設定する。
「JavaScript SDK」は<body>のすぐ後に配置するのが理想的。

<div id="fb-root"></div>
<script>
(function(d, s, id) {
var js, fjs = d.getElementsByTagName(s)[0];
if (d.getElementById(id)) return;
js = d.createElement(s);
js.id = id;
js.src = "//connect.facebook.net/ja_JP/all.js#xfbml=1";
fjs.parentNode.insertBefore(js, fjs);
}(document, 'script', 'facebook-jssdk'));
</script>
<div data-href="<?php the_permalink(); ?>" data-send="false" data-layout="box_count" data-width="450" data-show-faces="true"></div>

グーグルプラスのgoogle+1ボタン

google+1ページで情報を入力しコードを取得する。
http://www.google.com/intl/ja/webmasters/+1/button/
コード取得後、指定の場所にソースを埋め込むだけで設定が完了する。

<!-- このタグを +1 ボタンを表示する場所に挿入してください -->
<g:plusone size="tall"></g:plusone>

<!-- この render 呼び出しを適切な位置に挿入してください -->
<script type="text/javascript">
window.___gcfg = {lang: 'ja'};

(function() {
var po = document.createElement('script'); po.type = 'text/javascript'; po.async = true;
po.src = 'https://apis.google.com/js/plusone.js';
var s = document.getElementsByTagName('script')[0]; s.parentNode.insertBefore(po, s);
})();
</script>

はてなブックマークのBookmarkボタン

はてなブックマークボタンページでURLなどの情報を入力しコードを取得する。
http://b.hatena.ne.jp/guide/bbutton
hrefのhttp://b.hatena.ne.jp/entry/の後に<?php the_permalink(); ?>を記載する。
また、data-hatena-bookmark-titleに<?php the_title(); ?>を記載する。

<a href="http://b.hatena.ne.jp/entry/<?php the_permalink(); ?>" data-hatena-bookmark-title="<?php the_title(); ?>" data-hatena-bookmark-layout="vertical-balloon" title="このエントリーをはてなブックマークに追加">
<img src="http://b.st-hatena.com/images/entry-button/button-only.gif" alt="このエントリーをはてなブックマークに追加" width="20" height="20" style="border: none;" />
</a>
<script type="text/javascript" src="http://b.st-hatena.com/js/bookmark_button.js" charset="utf-8" async="async"></script>

mixiのイイネ!ボタン

mixiで「イイネ!ボタン」を設置する際は、デベロッパー登録が必要になる。
http://developer.mixi.co.jp/
登録したら、「mixi Plugin」の新規サービス追加でURLなどの情報を入力しコードを取得する。
取得したコードのdata-service-keyに識別キーを記載し、data-hrefを「 data-href=”<?php the_permalink(); ?>”」と書き換える。

<div data-plugins-type="mixi-favorite" data-service-key="識別キー" data-size="large" data-href="<?php the_permalink(); ?>" data-show-faces="false" data-show-count="true" data-show-comment="false" data-width=""></div>
<script type="text/javascript">
(function(d) {
var s = d.createElement('script');
s.type = 'text/javascript';
s.async = true;
s.src = '//static.mixi.jp/js/plugins.js#lang=ja';
d.getElementsByTagName('head')[0].appendChild(s);
})(document);
</script>